In Part 3 I showed you how to use Word to create a seed xml document that can be used to create a transformation template. It was late in the evening when I wrote this and there were a couple of mistakes in the posting. I had implied that you could take the SalespersonName element from the Customer element and move it down to the bottom of the letter. Unfortunately when I worked through my own example this did not work (the XSL does not include the text as expected.) I am sure there is a way to do this but I do not know how. If you are reading this and you know about such things, why not post a comment?
In this post, I will show you how to create the XSLT from the seed document you created in Part 3. The first thing you need to do is download the transform inference tool from the Microsoft downloads site. The download will install the tool: a command-line executable with some documentation. I accepted the default install path so, for me, it was installed in "C:\Program Files\Microsoft Office 2003 Developer Resources\Microsoft Office 2003 WordprocessingML Transform Inference Tool\".
In Part 3 I wrote about creating a seed document. If you have not done that, you will need to go back and follow those steps before being able to use the transform utility. I am assuming that you have a seed document stored as “customer seed.xml”.
Open a command prompt and change directory to the location of the inference tool. Type the following command:
WML2XSLT "c:\customer seed.xml"
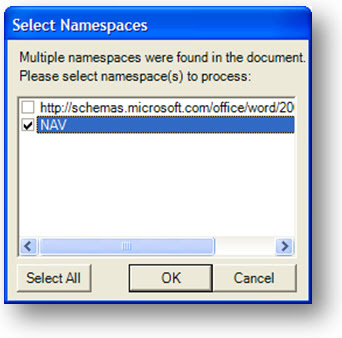
Since we have two namespaces in our seed document, you will see a dialogue box asking you to select the namespace you wish to use for the transform.

Tick the option for the namespace you put your NAV document in and hit OK.
Now take a look at the location where you stored your seed document. You will see a document with the same name but a with a ".xsl" extension.
The quickest way to test your XSL is to take your raw xml file and edit some of the data (try changing the customer name). Then save the raw xml file and open it in Word. When you open an xml file in Word, it prompts you for a style sheet to apply. Select the style sheet you created from your seed. You should now see a Word document that looks like your seed but with the changed data values from the raw file.
If everything is working properly, you can now import this style sheet for use with the send to application feature. For details on how to do this, go back to Part 1. Note that our transformation uses elements that are only available for the Customer card export, so when you import this style sheet, do it as a style sheet for form 21 only. You should also ensure that the application for the style sheet is Word.
That’s it. I don’t know if this is the best way of creating your XSLTs but it certainly works for me. The nice thing is that I don’t need to know the XSLT language in order to create the transform (which I think will be true for the majority of people that will need to create new templates.) I must stress that this series of postings is made with no warranty or support. If you follow this, you’re on your own. If anyone finds a better way of creating XSLT transforms for use with Dynamics NAV then I would like to know – please post a comment.


1 comment:
According to Mark Brummel's Blog posting from Technet 2007, Microsoft are planning on releasing a wywiwyg stylesheet manager. No release date as yet.
Post a Comment