Well done to the product team for getting NAV 2009 released to market. It's been a long haul for them and what they've acheived is truly remarkable. Dan Brown has made a blog post on the NAV Team Blog (read it here) in which he talks about the emotion that people attach to the new user experience and you should really go and read it if you have not done so already.
I've been playing around with NAV 2009 since the first release was made available to partners in May of this year. I'd seen some pretty cool videos previously and I was surpised to find the product looked just like the video and was fast and stable. The new Role Center approach is going to take some thinking from partners and initially introduces an extra step in the configuration process, but over time I can see this dominating the entire implementation process with the focus being more on the people in the organzation, the roles they play and the processes they need to perform and less on the data and the functions that are required to work on the data.
2009 is going to be a great year for NAV and I think it's going to be a whole heap of fun putting the theory into practice. Have you had chance to use it yet? If so, leave me a comment and let me know what you think of it.
Sunday, 23 November 2008
Wednesday, 19 November 2008
Watch out for the Demo Install
I'm amazed at how simple the demonstration install of NAV 2009 is. Click one button and it goes ahead and installs everything you need. A word of warning though, if you use this option and you have an existing NAV version installed (such as NAV 5.0 SP1) then the Microsoft Dynamics NAV folder will get overwritten without prompting. You may find it worthwhile copying your Microsoft Dynamics NAV folder to another folder (such as Microsoft Dynamics NAV 5.0 SP1) before doing the NAV 2009 install.
Monday, 17 November 2008
He's Been!
Santa came early this year and he's left me a shiny new download of Microsoft Dynamics NAV 2009. Yes that's right! It's finally here.
If you have access to PartnerSource, you can download it from the NAV 2009 Download Page.
I installed it on my home machine which is running Vista Home Premium with no SQL Server installed and I didn't really expect it to install. I ran the demo install and it just worked - it installed SQL 2005 Express, all the bits and created the demo database. I started the Microsoft Dynamics NAV Business Web Services service and the web services just worked!
Coolest thing for me? The date picker in the RoleTailored client on Vista is just so nice with animated zooming and swooshing and stuff. Nice!
Well done Microsoft NAV Product Group! This is a truly awesome version. I'm sure you feel like a well deserved rest after such a long haul.
Tuesday, 4 November 2008
CodeCamp 2008 - NAV Resources
Presenting on NAV to CodeCamp was great fun. Here are some follow up links.
I was asked if there was a way to get hold of the product to play with. The answer is that the you can download NAV 5.0 from MSDN if you have a MSDN subscription and you can also download a license file. You’ll find it under business solutions. The product DVD contains a load of documents as well that includes the application designers guide which is a really good introduction to programming in Dynamics NAV.
If you do not have a MSDN subscription, you can download a restricted version with some development capabilities from one of the online forums at http://www.mibuso.com/dlinfo.asp?FileID=950 although you will probably need to register on the forum before being able to download the file.
Here are some useful URLs for anyone that is interested in NAV...
- Free chapter of NAV programming book at: http://programming-microsoft-dynamics-nav.packtpub.com/
- MIBUSO user Forum http://www.mibuso.com/
- Dynamics User Forum http://dynamicsuser.net/
- Microsoft’s Community http://community.dynamics.com/nav/home.aspx
I also wrote a blog post that shows how to use the Web Services enablement of NAV 2009 with InfoPath which I didn't get time to demonstrate. You can read that on this blog here.
Thanks to everyone that attended my session and for the interesting questions that were raised.
Monday, 3 November 2008
Freddy's Blog Delivers the Goods on NAV 2009
It's great to see more and more MS guys blogging their stuff on Dynamics NAV 2009.
Freddys Blog from Freddy Kristiansen is the latest find for me and his first posts are out of this world. This is the sort of stuff that is only available from the product team and a big thanks to Freddy for taking the time to share these useful tips.
Other recent goodies can be found on Lars Lohndorf-Larsen's Blog and Claus Lundstrøm's Blog.
Sunday, 2 November 2008
NAV 2009 Web Services and InfoPath
I gave an introductory talk at Christchurch CodeCamp 2008 on Dynamics NAV from a Developer's Perspective yesterday but unfortunately ran out of time before being able to show this example of consuming a page web service in an InfoPath form, so I figured I'd make a blog post.
Lars Lohndorf-Larsen has already made a couple of posts on how to expose codeunits and pages as web services using the upcoming NAV 2009 three-tiered architecture and has provided a sample c# program for consuming them.
I'm using the Marketing Beta Release for this so any partner will be able to download the VPC image and repeat this exercise.
First of all, you'll need to expose the Customer Page (Object ID=21) as a web service with a service name of Customer. This is as simple as running form 810 Web Services and inserting a record with Object Type=Page, Object ID =21, Service Name=Customer and ticking the Published field.
 If you enter http://localhost:7047/DynamicsNAV/ws/CRONUS_International_Ltd/Page/Customer in your web browser, you should see the WSDL for the page web service. It still amazes me how easy this is.
Now it's time to start up InfoPath. On the Getting Started page, click the Design a Form Template... option on the left hand pane.
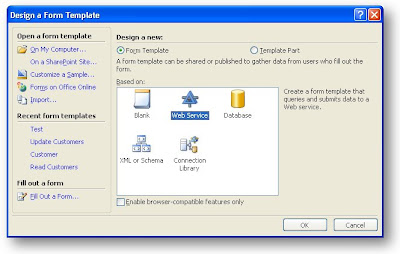 In the Design a Form Template dialog, click the Web Service option and click OK.
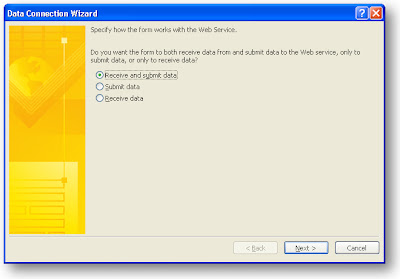 Select the option to Receive and submit data and click the Next button. Paste the URL for the Customer Web Service into the field that is asking for the location of the data connection web service. If you used the right URL (I just copied it from my browser address bar after I had checked the WSDL for my web service) you should see the following screen when you click Next.
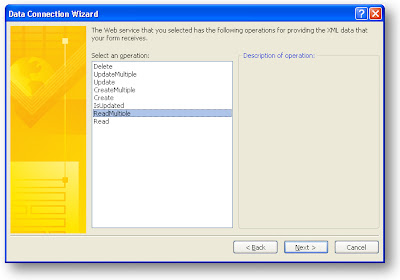 I found this screen a little confusing because I've never used InfoPath before I didn't realise it is wanting me to tell it which method can be used for reading data from the web service. Select the ReadMultiple option and click Next. On the next screen, you get an opportunity to name the data connection. I left mine as the default Main query and clicked Next. The next screen askes for the URL to the web service that will be used when users submit their changes. It defaults to the previous URL so just click Next. On the following screen you are asked to select the operation that will be used for submitting the data. I selected UpdateMultiple and clicked Next.
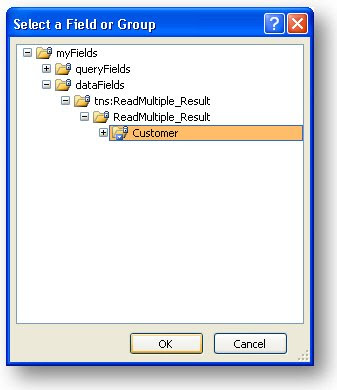
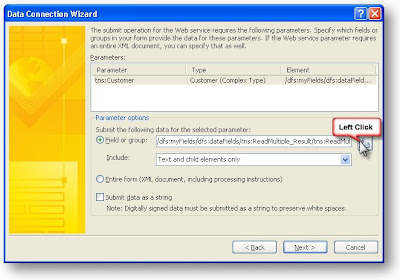 On this page we need to specify where the Customer comes from so I clicked the Modify button next to the Field or group text box and drilled down until I could select the Customer Node in the XML structure.
 You can leave the name for the data connection as Main submit and click the Finish button. If all went to plan, you should now have a new template to drag your fields on to.
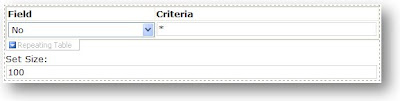
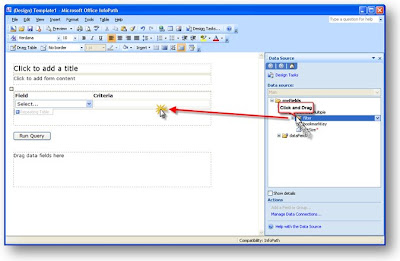 Drag the filter group on to the Query fields area of the design surface and select the option to add the groups as a repeating table. This way users will be able to add any filter fields to the read command. You can select the properties of these fields and set a default value - for example, Field defaults to No. and Criteria defaults to *. This will ensure you get some records back. You will also need the setSize parameter since this is mandatory for the ReadMultiple operation. Drag this on to the control surface and give it a default of 100. You should have a query section that looks something like this.
Now expand the dataFields node and drag the Customer node on to the fields area of the design surface and once again select Repeating Table as the option. This puts in every field which is way too much so just right click on the table after you have created it and selec the properties, then click the Change Binding button. You will see a tree that is expanded to show the customer node, that's fine, just click Next and you'll get on to a dialog where you can remove fields. For a quick way to remove all fields, click in the Columns in table list box and hold down Alt+R until there are no fields left - now you can click on the fields you want and add them. I used No, Name, Address and City. You should re-size the fields so they fit the available space and have a larger Name and Address field. Now it's time to run the form and see what happens. Click the Preview button. When prompted, select the option to connect rather than work offline. Hit the Run Query button and accept the dialog box and you should see something similar to the following.
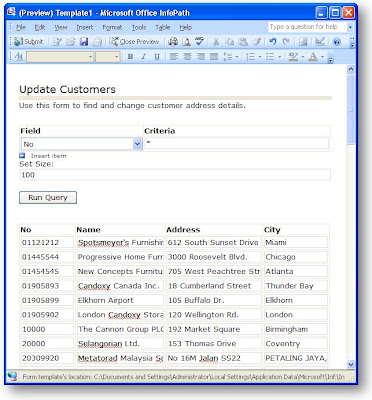 Nice! OK now you can try editing the name of one of the customers and hitting the submit button. If you see a dialog saying "The form was submitted successfully, you've just updated the NAV data!
Lars Lohndorf-Larsen has already made a couple of posts on how to expose codeunits and pages as web services using the upcoming NAV 2009 three-tiered architecture and has provided a sample c# program for consuming them.
I'm using the Marketing Beta Release for this so any partner will be able to download the VPC image and repeat this exercise.
First of all, you'll need to expose the Customer Page (Object ID=21) as a web service with a service name of Customer. This is as simple as running form 810 Web Services and inserting a record with Object Type=Page, Object ID =21, Service Name=Customer and ticking the Published field.
 If you enter http://localhost:7047/DynamicsNAV/ws/CRONUS_International_Ltd/Page/Customer in your web browser, you should see the WSDL for the page web service. It still amazes me how easy this is.
Now it's time to start up InfoPath. On the Getting Started page, click the Design a Form Template... option on the left hand pane.
 In the Design a Form Template dialog, click the Web Service option and click OK.
 Select the option to Receive and submit data and click the Next button. Paste the URL for the Customer Web Service into the field that is asking for the location of the data connection web service. If you used the right URL (I just copied it from my browser address bar after I had checked the WSDL for my web service) you should see the following screen when you click Next.
 I found this screen a little confusing because I've never used InfoPath before I didn't realise it is wanting me to tell it which method can be used for reading data from the web service. Select the ReadMultiple option and click Next. On the next screen, you get an opportunity to name the data connection. I left mine as the default Main query and clicked Next. The next screen askes for the URL to the web service that will be used when users submit their changes. It defaults to the previous URL so just click Next. On the following screen you are asked to select the operation that will be used for submitting the data. I selected UpdateMultiple and clicked Next.
 On this page we need to specify where the Customer comes from so I clicked the Modify button next to the Field or group text box and drilled down until I could select the Customer Node in the XML structure.
 You can leave the name for the data connection as Main submit and click the Finish button. If all went to plan, you should now have a new template to drag your fields on to.
  Drag the filter group on to the Query fields area of the design surface and select the option to add the groups as a repeating table. This way users will be able to add any filter fields to the read command. You can select the properties of these fields and set a default value - for example, Field defaults to No. and Criteria defaults to *. This will ensure you get some records back. You will also need the setSize parameter since this is mandatory for the ReadMultiple operation. Drag this on to the control surface and give it a default of 100. You should have a query section that looks something like this.
Now expand the dataFields node and drag the Customer node on to the fields area of the design surface and once again select Repeating Table as the option. This puts in every field which is way too much so just right click on the table after you have created it and selec the properties, then click the Change Binding button. You will see a tree that is expanded to show the customer node, that's fine, just click Next and you'll get on to a dialog where you can remove fields. For a quick way to remove all fields, click in the Columns in table list box and hold down Alt+R until there are no fields left - now you can click on the fields you want and add them. I used No, Name, Address and City. You should re-size the fields so they fit the available space and have a larger Name and Address field. Now it's time to run the form and see what happens. Click the Preview button. When prompted, select the option to connect rather than work offline. Hit the Run Query button and accept the dialog box and you should see something similar to the following.
 Nice! OK now you can try editing the name of one of the customers and hitting the submit button. If you see a dialog saying "The form was submitted successfully, you've just updated the NAV data!
Subscribe to:
Posts (Atom)

