At our recent NAV User Group conference, I had the pleasure of seeing some new NAV 2009 functionality demoed by our local Microsoft ERP Expert.
In the demo, Sue set a filter on a list of records (I think it was a vendor list) and then from the Actions command menu selected a new option called "Edit in Excel".
This looked similar to the Send to Excel feature with one difference. There was a new button on a Dynamics NAV tab of the Ribbon that allowed the data to be updated.
In the demo, Sue deliberately set the Responsibility Centre in the spreadsheet to an invalid value and the update returned an error message that the Responsibility Centre was not valid. She then corrected the data in the spreadsheet, hit the update button and the data was updated in NAV.
This was a fantastic demonstration of the new NAV 2009 web services in action. I'm pretty sure this option is not available in the Marketing Beta Release that is available to partners and the image Sue had was based on Windows Server 2008.
It looks like there's definitely more cool stuff coming in the NAV 2009 release and this ability to edit data in Excel is going to prove extremely useful to many users.
Showing posts with label Send to Application. Show all posts
Showing posts with label Send to Application. Show all posts
Friday, 24 October 2008
Thursday, 25 September 2008
When Ctrl+C, Ctrl+V Fails--Send to Excel Saves the Day!
The other day a very scary thing happened to me-copy and paste from NAV failed! I was on a sales order and I copied the sales lines to the clipboard and pasted them to Excel. Nothing new there, we've been able to do this for years and it's been a pretty cool feature of NAV but when I came to check the totals, I was horrified to see that a few of my sales lines were missing!
I tried again and still they were missing. After some investigation, I found the cause of the problem was that some of my items had a double quote in the description for the items. This is not uncommon, especially when you have descriptions with inch sizing in the description. The problem seems to be when the very start of a field is a double quote and there is no double quote at the end. Excel was taking from the start of the double quote to the next double quote as being a full description field (so one of my fields included 10 or so sales lines in the field.)
I was about to log this with Microsoft as a problem with NAV when I saw that if I typed similar data into a text file and copied and pasted into Excel, exactly the same thing happened.
Thankfully the new (version 5.0 new) send to Excel feature saved the day as the XML approach copes with the double quotes without a problem.
Wednesday, 6 June 2007
Dynamics NAV 5.0 - Send to Application Feature - The Continuing Saga
Did you ever start something and wish you hadn't?
I thought it would be fun to blog about Dynamics NAV 5.0. I thought it would be easy to write a short posting following the investigation of new features. Why oh why did I start with the send to application feature? It has turned out to be far more work than I had expected. Oh well...
First of all, I would like to mention that I have already written too many posts on this subject. You can see them all by clicking the Send to Application Label on this blog. I won't say how many there are because, no doubt, I will need to add more when I finally figure things out.
I think I should mention Mark Brummel's Reporting from TechEd 2007 posting in which he says:
One of the issues with the office xml interface is that the changing of the stylesheets is very difficult unless you like reading xml schema's.
Fortunately they have changed that and added a stylesheet manager that allowes you to create them in a wysiwyg way. Great! It will be released shortly but there is no official date.
If you have been reading my posts on this topic, you will know that you probably already have a wysisyg editor for the stylesheets needed to transform xml data to Word documents - that is - Word itself. The more I look at the results of using the wml2xslt transform inference tool and compare this to the example stylesheets supplied with NAV 5.0, the more I think that maybe this is not going to work - it looks as though someone really did code this sample stylesheets by hand. I still can't get elements from within the same node to appear in different parts of the document. If anyone has any ideas, please post a comment.
Now the reason I am writing another post on this topic is the changes I suggested making to codeunit 403 will break the standard stylesheets that come with the CRONUS database. Oops.
I have figured out a way to create the stylesheet without hacking the codeunit that also leaves the existing stylesheets in their current working form.
To start with - don't edit codeunit 403 to add the xmlns attribute. Instead, generate the Customer Raw xml file as described but then open the xml file in notepad and manually add the xmlns="NAV" attribute at the end of the Object opening tag.
Now you can follow the previous instructions for creating the Customer Seed xml file (although I still haven't figured out how to use same elements in different parts of the document.)
Finally, use Notepad to open the Customer Seed xsl file (the transform that is generated by the wml2xslt utility) and find the xmlns attribute for the "NAV" namespace. When I tried this, it was ns0 as follows:
... xmlns:ns0="NAV"
Use search and replace to replace all ocurrences of "ns0:" with "" (ignore the quotes so you are replacing it with blanks.) Save the edited xslt file and you're done.
You should now be able to use this xslt file to transform the NAV xml as required - and all your standard stylesheets will still work. Phew!
Monday, 4 June 2007
Dynamics NAV 5.0 – Send to Application Feature – Part 4
This is the last part of a series of postings on using the new send to application feature in Dynamics NAV 5.0.
In Part 3 I showed you how to use Word to create a seed xml document that can be used to create a transformation template. It was late in the evening when I wrote this and there were a couple of mistakes in the posting. I had implied that you could take the SalespersonName element from the Customer element and move it down to the bottom of the letter. Unfortunately when I worked through my own example this did not work (the XSL does not include the text as expected.) I am sure there is a way to do this but I do not know how. If you are reading this and you know about such things, why not post a comment?
In this post, I will show you how to create the XSLT from the seed document you created in Part 3. The first thing you need to do is download the transform inference tool from the Microsoft downloads site. The download will install the tool: a command-line executable with some documentation. I accepted the default install path so, for me, it was installed in "C:\Program Files\Microsoft Office 2003 Developer Resources\Microsoft Office 2003 WordprocessingML Transform Inference Tool\".
In Part 3 I wrote about creating a seed document. If you have not done that, you will need to go back and follow those steps before being able to use the transform utility. I am assuming that you have a seed document stored as “customer seed.xml”.
Open a command prompt and change directory to the location of the inference tool. Type the following command:
WML2XSLT "c:\customer seed.xml"
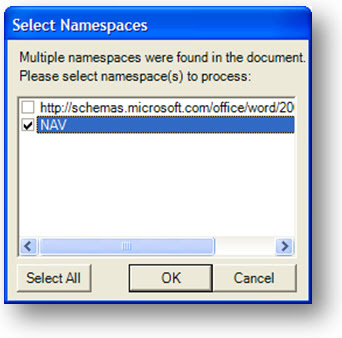
Since we have two namespaces in our seed document, you will see a dialogue box asking you to select the namespace you wish to use for the transform.
In Part 3 I showed you how to use Word to create a seed xml document that can be used to create a transformation template. It was late in the evening when I wrote this and there were a couple of mistakes in the posting. I had implied that you could take the SalespersonName element from the Customer element and move it down to the bottom of the letter. Unfortunately when I worked through my own example this did not work (the XSL does not include the text as expected.) I am sure there is a way to do this but I do not know how. If you are reading this and you know about such things, why not post a comment?
In this post, I will show you how to create the XSLT from the seed document you created in Part 3. The first thing you need to do is download the transform inference tool from the Microsoft downloads site. The download will install the tool: a command-line executable with some documentation. I accepted the default install path so, for me, it was installed in "C:\Program Files\Microsoft Office 2003 Developer Resources\Microsoft Office 2003 WordprocessingML Transform Inference Tool\".
In Part 3 I wrote about creating a seed document. If you have not done that, you will need to go back and follow those steps before being able to use the transform utility. I am assuming that you have a seed document stored as “customer seed.xml”.
Open a command prompt and change directory to the location of the inference tool. Type the following command:
WML2XSLT "c:\customer seed.xml"
Since we have two namespaces in our seed document, you will see a dialogue box asking you to select the namespace you wish to use for the transform.

Tick the option for the namespace you put your NAV document in and hit OK.
Now take a look at the location where you stored your seed document. You will see a document with the same name but a with a ".xsl" extension.
The quickest way to test your XSL is to take your raw xml file and edit some of the data (try changing the customer name). Then save the raw xml file and open it in Word. When you open an xml file in Word, it prompts you for a style sheet to apply. Select the style sheet you created from your seed. You should now see a Word document that looks like your seed but with the changed data values from the raw file.
If everything is working properly, you can now import this style sheet for use with the send to application feature. For details on how to do this, go back to Part 1. Note that our transformation uses elements that are only available for the Customer card export, so when you import this style sheet, do it as a style sheet for form 21 only. You should also ensure that the application for the style sheet is Word.
That’s it. I don’t know if this is the best way of creating your XSLTs but it certainly works for me. The nice thing is that I don’t need to know the XSLT language in order to create the transform (which I think will be true for the majority of people that will need to create new templates.) I must stress that this series of postings is made with no warranty or support. If you follow this, you’re on your own. If anyone finds a better way of creating XSLT transforms for use with Dynamics NAV then I would like to know – please post a comment.
Sunday, 3 June 2007
Dynamics NAV 5.0 – Send to Application Feature – Part 3
This is my third posting on the new send to application feature in Dynamics NAV 5.0. After my initial introduction, my second post explained how to create an XSLT that would show the raw xml produced by NAV.
In this post I am going to show you how you can use a graphical editing tool (that you probably already have) to create your own XSLT. You will need the XSLT we created in Part 2 so if you haven’t read that yet, I suggest you jump back and start there.
I have read a few posts on this topic asking whether there are any tools that can help you create XSLT transformations without having to hack xml in a text editor. You may be surprised to learn that Microsoft Word (2003 or 2007) can be used to format your raw xml file to create a seed file and a transform inference tool (provided by Microsoft) will then create the XSLT for you.
There is one little snag (isn’t there always?) The transform inference tool (what a great acronym that makes ;-) needs the raw xml file to have a namespace attribute. Unfortunately NAV does not include a namespace attribute in the xml document it creates so the first thing we need to do is change the code that generates the xml so that this attribute is added.
Open up Codeunit 403 - Application Launch Management and press Ctrl-End to get to the bottom of the code. The third-to-last function is called AddElement and is used to add all of the elements to our raw xml file. In this example, I am going to use a namespace of ‘NAV’ – but you could use anything, provided it is not used by other XML documents (this is why you often see a URL in the name space.) Add a new line in the code so it looks like this:
ChildNode := ParentNode.ownerDocument.createNode('element', NodeName, '');
ChildNode.text := NodeText;AddAttribute(ChildNode,'xmlns','NAV'); // My new line to set the namespace attribute.
ParentNode.appendChild(ChildNode);
CreatedChildNode := ChildNode;
Now we get to the point where you’ll need the XSLT we created in Part 2. Hopefully you have this hooked up to export to Internet Explorer. I am going to create a new letter template to be generated from the customer card so, first of all, you need to export a customer record to give us our raw file. Launch the customer card (Sales & Marketing > Sales > Customers) and click the Send Options button on the toolbar. Select the Internet Explorer application and the Style Sheet we created in Part 2. Hit the Send button and you should see Internet Explorer launch with an XML document.
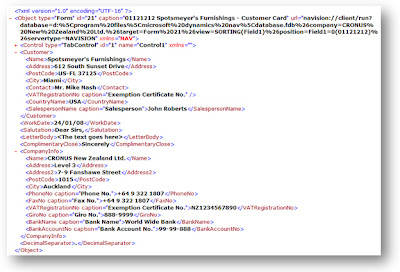
In the image, I have collapsed the Control element to show the Customer, WorkDate, Salutation, LetterBody, ComplimentaryClose, CompanyInfo, and DecimalSeparator elements. You’ll notice that the Control element has a different namespace to the other elements (it shows xmlns=“”.) This is because the Control elements are already in the DataXML document when our codeunit 403 runs so it does not get the xmlns attribute added by our line of code. Since we are only going to use the extra elements and not the control elements, let’s not worry about this.
I would expect there will be some changes to the way NAV creates this XML document in the future. As you will see, Word does not work very well with empty elements where the data is actually stored within the attributes. I would not be surprised if the Control elements are changed so that value attribute is actually the text of the control node rather than being an attribute. I would also expect that a namespace attribute will be added – but who knows? Maybe Microsoft has some other grand plan for making it easy for users to create their own XSLT transformations.
From within Internet Explorer, save the XML file as “customer raw.xml” and open the file in Word. I am using Word 2007 but I am pretty sure the same features are available in Word 2003.The first thing you will notice is a whole bunch of empty tags. The first time I saw this, I figured I was doing something wrong – until I realised that the values of the form controls are attributes and Word does not display the attributes in the Word document.

We can get rid of these Control elements. Double click the first Control tag and press Delete. You should now see the Object element with the Customer and other elements beneath it.
In this post I am going to show you how you can use a graphical editing tool (that you probably already have) to create your own XSLT. You will need the XSLT we created in Part 2 so if you haven’t read that yet, I suggest you jump back and start there.
I have read a few posts on this topic asking whether there are any tools that can help you create XSLT transformations without having to hack xml in a text editor. You may be surprised to learn that Microsoft Word (2003 or 2007) can be used to format your raw xml file to create a seed file and a transform inference tool (provided by Microsoft) will then create the XSLT for you.
There is one little snag (isn’t there always?) The transform inference tool (what a great acronym that makes ;-) needs the raw xml file to have a namespace attribute. Unfortunately NAV does not include a namespace attribute in the xml document it creates so the first thing we need to do is change the code that generates the xml so that this attribute is added.
Open up Codeunit 403 - Application Launch Management and press Ctrl-End to get to the bottom of the code. The third-to-last function is called AddElement and is used to add all of the elements to our raw xml file. In this example, I am going to use a namespace of ‘NAV’ – but you could use anything, provided it is not used by other XML documents (this is why you often see a URL in the name space.) Add a new line in the code so it looks like this:
ChildNode := ParentNode.ownerDocument.createNode('element', NodeName, '');
ChildNode.text := NodeText;AddAttribute(ChildNode,'xmlns','NAV'); // My new line to set the namespace attribute.
ParentNode.appendChild(ChildNode);
CreatedChildNode := ChildNode;
Now we get to the point where you’ll need the XSLT we created in Part 2. Hopefully you have this hooked up to export to Internet Explorer. I am going to create a new letter template to be generated from the customer card so, first of all, you need to export a customer record to give us our raw file. Launch the customer card (Sales & Marketing > Sales > Customers) and click the Send Options button on the toolbar. Select the Internet Explorer application and the Style Sheet we created in Part 2. Hit the Send button and you should see Internet Explorer launch with an XML document.

In the image, I have collapsed the Control element to show the Customer, WorkDate, Salutation, LetterBody, ComplimentaryClose, CompanyInfo, and DecimalSeparator elements. You’ll notice that the Control element has a different namespace to the other elements (it shows xmlns=“”.) This is because the Control elements are already in the DataXML document when our codeunit 403 runs so it does not get the xmlns attribute added by our line of code. Since we are only going to use the extra elements and not the control elements, let’s not worry about this.
I would expect there will be some changes to the way NAV creates this XML document in the future. As you will see, Word does not work very well with empty elements where the data is actually stored within the attributes. I would not be surprised if the Control elements are changed so that value attribute is actually the text of the control node rather than being an attribute. I would also expect that a namespace attribute will be added – but who knows? Maybe Microsoft has some other grand plan for making it easy for users to create their own XSLT transformations.
From within Internet Explorer, save the XML file as “customer raw.xml” and open the file in Word. I am using Word 2007 but I am pretty sure the same features are available in Word 2003.The first thing you will notice is a whole bunch of empty tags. The first time I saw this, I figured I was doing something wrong – until I realised that the values of the form controls are attributes and Word does not display the attributes in the Word document.
We can get rid of these Control elements. Double click the first Control tag and press Delete. You should now see the Object element with the Customer and other elements beneath it.

Now you can format this document how you want. Create tables, add graphics, etc. When you move data, be sure to copy all of the tags. For example, if you want to put the customer’s name, you would need to ensure it is still within the parent tags of Customer and Object.

Above you can see my re-formatted document. I find it easier to work with the format with the XML tags displayed. Then I remove the tags by removing the tick from the Show XML tags in the document. It looks like this:

Save your document in an xml format when you’re happy with the layout. In Word 2007, this means saving as a Word 2003 xml Document. Make sure you remove the tick from save data only. If you don’t remove this tick, your transformation won’t work. I find it easier to save my document with a name “customer seed.xml” as this lets me easily identify which file contains the raw data and which is the seed for my transformation.
Sunday, 13 May 2007
Dynamics NAV 5.0 – Send to Application Feature – Part 2
In my previous post on this topic, I looked at the send to application feature in Dynamics NAV 5.0. I explained that you can send data from NAV to Word, Excel or any other application by using an XSLT template to transform the XML data into a format that the target application understands. I also introduced the WordprocessingML language that can be used to create Word documents as XML files – a feature that Microsoft introduced in office 2003.
In this post I am going to show you how to see what NAV is producing as the starting XML file before any transformation is applied. Then we'll look at the WordprocessingML schema and create a simple Word document using Notepad. If you want to see the results of your efforts, you'll need Word 2003 or 2007 installed.
The first thing I wanted to know when I saw this new feature was how it worked. I understood the concepts of XSLT and WordprocessingML and applying transformations to XML files but I had never done it in practice. I didn't know what NAV was giving us to work with. In order to be able to make my own transformations, I needed to first know what my starting point was.
XSLT is a language that can be used to transform an XML file from one format to another. I knew that I could load my own XSLT file as a template for NAV to use but I didn't know what my starting XML file would be. I would like to pretend I am some kind of XSLT guru, but the truth is I just asked some people at work. My question was "what do I need in an XSLT to make my output file a copy of my input file?" The hardest part was convincing people I was not crazy and listening patiently as they explained that there was no point in applying a transformation that would make the output file identical to the input file. I think the answer ultimately came from a Google search – but it helps to know what you are looking for.
Open up Notepad and enter this text:
<xsl:stylesheet xmlns:xsl="http://www.w3.org/1999/XSL/Transform" version="1.0">
</xsl:stylesheet>
Now save the file as "Copy All.xslt".
Since the file is so short, I will give you my expert explanation of its contents. The first line is probably really interesting. All I know is you need it - so put it in there for all of your XSLT files otherwise they won't work. It's something to do with defining this document as being a stylesheet and indicating that anything that starts with xsl: in the document will be defined in the schema that is referenced by the namespace provided. Incidentally, if you paste the http://www.w3.org/1999/XSL/Transform URL into a web browser, you'll see a link to the XSL Transformations specification. If you really want to learn about XSLT this is probably a good starting point.
The second line says find the start of the file you are reading.
The third line says copy everything without changing it.
Lines four and five are the closing tags for lines two and one respectively.
Now we have our transform, let's look at applying it to NAV. First we'll set up a new application to handle our transform. We need something that's good at displaying XML files – so I decided to use Internet Explorer.
Select Administration > IT Administration > General Setup > Launch Applications. The Send-to Programs form is displayed showing two programs: Excel.exe and Winword.exe.
Create a new record and enter IEXPLORE.EXE as the executable and Internet Explorer as the name. Press Esc to close the window.
Now I want to import my new template and tell NAV to use Internet Explorer to launch the resulting XML file.
Select Administration > IT Administration > General Setup > Manage Stylesheets. The Manage Style Sheets form is displayed showing all style sheets that have been set up for the database (oops – maybe that should have been set up as data per company since your templates are likely to contain company logos – as Microsoft would say: "this is a reseller opportunity" meaning: "oops we stuffed it up – you fix it"). In the standard CRONUS company this will mean a default stylesheet for Word and Excel (common to all forms) and a few form-specific templates (Customer Card letter template, Vendor Card letter, etc.)
Before you can create a new template, you need to select either the Style sheets common to all forms or Style sheets for this form only radio button against the Show label. For this example we want to be able to export from any form so click the Style sheets common to all forms radio button.
Maybe you are thinking you can now create a new record in the list of stylesheets – but that would be too easy. Instead, you should select the Import option from the Functions menu button. The system will display the Import Style Sheet form. Use the assist edit button to open the "Copy All.xslt" you saved earlier or type the path and file name into the Style Sheet field. Enter "Copy All to IE" into the Name field. Use the look-up button to select Internet Explorer as the Send-to Program. Click the OK button to import the stylesheet. You should now see a new line in the Manage Style Sheets form and, if all has gone well, we will now be able to test it out.
Open the Customer Card and click the Send Options button. The Program Selection form is displayed. Select our new Internet Explorer program. The Style Sheet field is showing the first style sheet that can be used for the data we are exporting. If it is not the one you want, click on the field and use the look-up button to select a different style sheet – in this example you should have only one stylesheet set up for the Internet Explorer program. Click the Send button.
If all has gone well, you should now see Internet Explorer with a new xml file displaying the information from the Customer card. Take a look at our xml file. You'll notice that the first part just gives us a hierarchy of all the controls on the form starting with Form, then Tab Control, then Tab Page, then a mixture of labels and text boxes. After the controls, we see some other sections for Customer, WorkDate, Salutation, CompanyInfo, etc. This suggests to me that there is something funny going on. How does NAV know that these things are important? We'll look at how you can create your own custom content to the XML file in a later posting.
To wrap things up, let's take a look at a simple WordprocessingML file. In my next post on this topic, I'll look at how we can create an XSLT to make a Word document in a format of our design.
WordprocessingML is a neat language that allows you to serialise an entire Word document as an XML file. The majority of the file contains tags that start with "w:". The text is typically built up from paragraphs (w:p), runs (w:r) and text (w:t) elements.
Open up Notepad and enter this text:
<?xml version="1.0"?>
<?mso-application progid="Word.Document"?>
<w:wordDocument xmlns:w="http://schemas.microsoft.com/office/word/2003/wordml">
<w:body>
<w:p>
<w:r>
<w:t>WordML Rocks!</w:t>
</w:r>
</w:p>
</w:body>
</w:wordDocument>
Now save the file as "WordML Rocks.xml". Even though the file extension is xml, the file is displayed with a WordML icon. This is because of the progid="Word.Document" property. Explorer is looking inside the xml file to determine how to display the icon.
Double click the file and Word will launch and display a document with a single line of text.
That's all for now. If you want to earn bonus points, you could take a look at the XSLT templates used in the CRONUS company and the XML files they produce.
Thursday, 3 May 2007
Dynamics NAV 5.0 - Send to Application Feature - Part 1
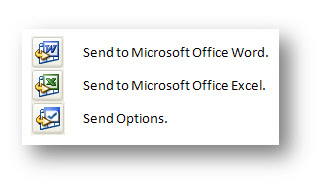
There are four new buttons on the toolbar for Microsoft Dynamics NAV 5.0. This posting starts to look at the three buttons used for sending data to other programs.
Word springs into life with a new document (called “10000 The Cannon Group PLC – Customer Card.xml”), stored in your temporary file path.
The sample document is a letter formatted to contain a CRONUS company logo and address details, Customer Address Details, Today’s Date, Salutation, etc. There is a place for you to type your letter contents.
Close Word and return to Dynamics NAV. Now hit the Send to Microsoft Office Excel button (you could use the Ctrl+E shortcut).
This time Excel opens and we are looking at another xml file. There is one Excel sheet within the workbook for each of the tab pages on the NAV form. Each sheet contains a title, the caption for the tab and the labels and data values for each of the fields on the tab page.
From Office 2003 onwards, Microsoft provided the ability to save a Word or Excel document as an XML file using their WordprocessingML or SpreadsheetML schemas. The new feature in Dynamics NAV takes advantage of this by grabbing the information on the screen and generating an XML file which it then transforms into another format by using a pre-defined XSLT (a file that describes how one XML file should be transformed into another).
You can create your own XSLT files and load them into NAV so that they can be used to make transformations. You can even specify your own applications to handle the new file, so you are not limited to using only Word or Excel.
I have two issues with this new feature. 1) Creating the XSLT file is not easy. If you have the ability to do this, you could probably have written some C/AL code to create the Word document directly. 2) Why would you use this feature? I am really struggling to think of a situation where this would be useful. If anyone has any suggestions, I would like to know.
I could only think of one possible use for this: if I wanted to write a user training document or document a test case and I wanted to list all of the fields on a form, this would be quite a neat way of doing it, but this is not a typical scenario for an end-user. Maybe I am not thinking laterally enough.
In the next post on this subject, I’ll take a look at how to set up a new XSLT so I can see what NAV is giving us to work with. Then, I’ll look at creating a Word document from scratch by making a new XSLT for WordprocessingML.

You’ll find the relevant help topic under Welcome to Dynamics NAV Help > Using Microsoft Dynamics NAV > Sending Data to Other Programs. This tells us that we can export data from NAV to other programs such as Microsoft Office Word or Excel. You can also export data to any other program that can handle an XML file.
To see this in action, use the CRONUS demo company for version 5.0 and open a customer card (Sales & Marketing > Order Processing > Customers); I am using customer account 10000 for The Cannon Group PLC. Now click on the Send to Microsoft Office Word button (or use the Ctrl+W shortcut key).
Word springs into life with a new document (called “10000 The Cannon Group PLC – Customer Card.xml”), stored in your temporary file path.
The sample document is a letter formatted to contain a CRONUS company logo and address details, Customer Address Details, Today’s Date, Salutation, etc. There is a place for you to type your letter contents.
Close Word and return to Dynamics NAV. Now hit the Send to Microsoft Office Excel button (you could use the Ctrl+E shortcut).
This time Excel opens and we are looking at another xml file. There is one Excel sheet within the workbook for each of the tab pages on the NAV form. Each sheet contains a title, the caption for the tab and the labels and data values for each of the fields on the tab page.
From Office 2003 onwards, Microsoft provided the ability to save a Word or Excel document as an XML file using their WordprocessingML or SpreadsheetML schemas. The new feature in Dynamics NAV takes advantage of this by grabbing the information on the screen and generating an XML file which it then transforms into another format by using a pre-defined XSLT (a file that describes how one XML file should be transformed into another).
You can create your own XSLT files and load them into NAV so that they can be used to make transformations. You can even specify your own applications to handle the new file, so you are not limited to using only Word or Excel.
I have two issues with this new feature. 1) Creating the XSLT file is not easy. If you have the ability to do this, you could probably have written some C/AL code to create the Word document directly. 2) Why would you use this feature? I am really struggling to think of a situation where this would be useful. If anyone has any suggestions, I would like to know.
I could only think of one possible use for this: if I wanted to write a user training document or document a test case and I wanted to list all of the fields on a form, this would be quite a neat way of doing it, but this is not a typical scenario for an end-user. Maybe I am not thinking laterally enough.
In the next post on this subject, I’ll take a look at how to set up a new XSLT so I can see what NAV is giving us to work with. Then, I’ll look at creating a Word document from scratch by making a new XSLT for WordprocessingML.
Subscribe to:
Posts (Atom)

