I was recently playing around with Codeunit Web services in NAV 2009 and after making a change which involved adding a function to my Codeunit, the Web service was no longer available for me to call.
I brought up the list of the services on my computer (http://localhost:7047/DynamicsNAV/ws/Services) and it was still showing in the list, but when I entered the URL for the actual Web service WSDL, I got an error.
It turns out, the reason was because one of the functions I had added to my Codeunit took an Automation object as a parameter. If you get this problem, the thing to do is bring up the properties for the function and set the Local property to Yes. Once that is done, the offending Function is hidden from the Web service and normality is restored.
Showing posts with label Web Services. Show all posts
Showing posts with label Web Services. Show all posts
Tuesday, 23 December 2008


Thursday, 11 December 2008
Implementing Microsoft Dynamics NAV 2009
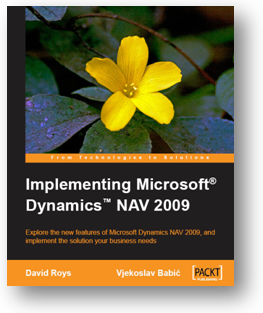
What a great way to wake up! You can now pre-order our book. I woke up this morning to see that the link to pre-order the book with a discount was up on the PACKT site. Wow!
I have co-authored this book with my good friend Vjekoslav Babić, and I can see that he's been busy blogging about the book and letting everyone know. One of the reasons I have been so quiet in the blogoshpere and on my favourite forum over the last few months is because I've been working so hard to get this book finished.
We've really tried to make this book as informative as possible, while keeping the fun elements from our blogs. There have been some fantastic people involved in producing this book, with feedback from members of the product group and technical reviewing from seasoned NAV experts and bloggers (like Eric 'Waldo' Wauters). Thanks to everyone that has read this blog over the years and to those that have left the occasional comment.
The book is aimed at consultants and developers of NAV and gives an insight into the new features of NAV 2009, and also a series of tips and tricks and practical examples for configuring, modifying, and extending the application. I can honestly say that this is the best book on NAV 2009 I have ever written.
So what are you waiting for? Go and pre-order your copy now.
Sunday, 2 November 2008
NAV 2009 Web Services and InfoPath
I gave an introductory talk at Christchurch CodeCamp 2008 on Dynamics NAV from a Developer's Perspective yesterday but unfortunately ran out of time before being able to show this example of consuming a page web service in an InfoPath form, so I figured I'd make a blog post.
Lars Lohndorf-Larsen has already made a couple of posts on how to expose codeunits and pages as web services using the upcoming NAV 2009 three-tiered architecture and has provided a sample c# program for consuming them.
I'm using the Marketing Beta Release for this so any partner will be able to download the VPC image and repeat this exercise.
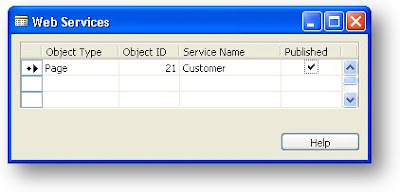
First of all, you'll need to expose the Customer Page (Object ID=21) as a web service with a service name of Customer. This is as simple as running form 810 Web Services and inserting a record with Object Type=Page, Object ID =21, Service Name=Customer and ticking the Published field.
 If you enter http://localhost:7047/DynamicsNAV/ws/CRONUS_International_Ltd/Page/Customer in your web browser, you should see the WSDL for the page web service. It still amazes me how easy this is.
Now it's time to start up InfoPath. On the Getting Started page, click the Design a Form Template... option on the left hand pane.
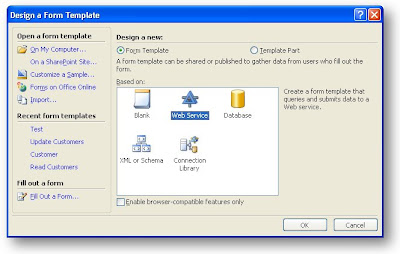 In the Design a Form Template dialog, click the Web Service option and click OK.
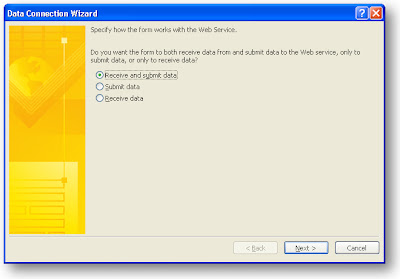 Select the option to Receive and submit data and click the Next button. Paste the URL for the Customer Web Service into the field that is asking for the location of the data connection web service. If you used the right URL (I just copied it from my browser address bar after I had checked the WSDL for my web service) you should see the following screen when you click Next.
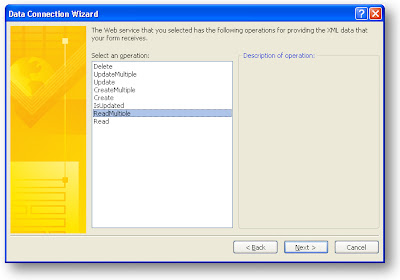 I found this screen a little confusing because I've never used InfoPath before I didn't realise it is wanting me to tell it which method can be used for reading data from the web service. Select the ReadMultiple option and click Next. On the next screen, you get an opportunity to name the data connection. I left mine as the default Main query and clicked Next. The next screen askes for the URL to the web service that will be used when users submit their changes. It defaults to the previous URL so just click Next. On the following screen you are asked to select the operation that will be used for submitting the data. I selected UpdateMultiple and clicked Next.
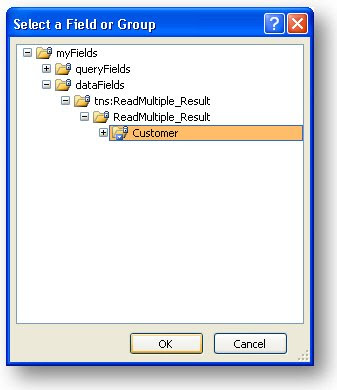
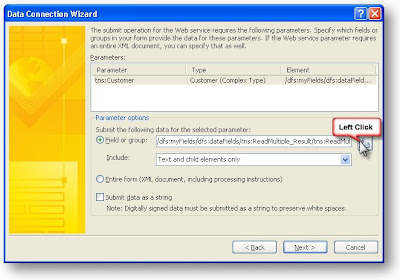 On this page we need to specify where the Customer comes from so I clicked the Modify button next to the Field or group text box and drilled down until I could select the Customer Node in the XML structure.
 You can leave the name for the data connection as Main submit and click the Finish button. If all went to plan, you should now have a new template to drag your fields on to.
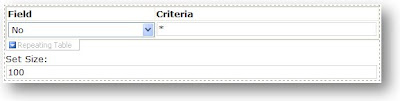
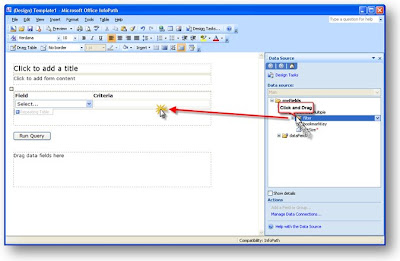 Drag the filter group on to the Query fields area of the design surface and select the option to add the groups as a repeating table. This way users will be able to add any filter fields to the read command. You can select the properties of these fields and set a default value - for example, Field defaults to No. and Criteria defaults to *. This will ensure you get some records back. You will also need the setSize parameter since this is mandatory for the ReadMultiple operation. Drag this on to the control surface and give it a default of 100. You should have a query section that looks something like this.
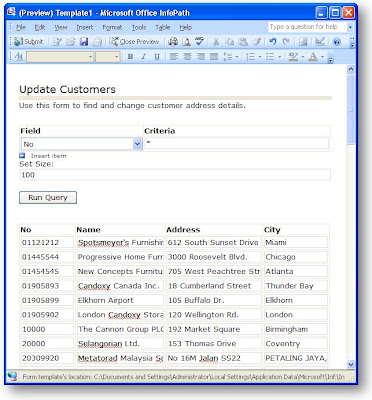
Now expand the dataFields node and drag the Customer node on to the fields area of the design surface and once again select Repeating Table as the option. This puts in every field which is way too much so just right click on the table after you have created it and selec the properties, then click the Change Binding button. You will see a tree that is expanded to show the customer node, that's fine, just click Next and you'll get on to a dialog where you can remove fields. For a quick way to remove all fields, click in the Columns in table list box and hold down Alt+R until there are no fields left - now you can click on the fields you want and add them. I used No, Name, Address and City. You should re-size the fields so they fit the available space and have a larger Name and Address field. Now it's time to run the form and see what happens. Click the Preview button. When prompted, select the option to connect rather than work offline. Hit the Run Query button and accept the dialog box and you should see something similar to the following.
 Nice! OK now you can try editing the name of one of the customers and hitting the submit button. If you see a dialog saying "The form was submitted successfully, you've just updated the NAV data!
Lars Lohndorf-Larsen has already made a couple of posts on how to expose codeunits and pages as web services using the upcoming NAV 2009 three-tiered architecture and has provided a sample c# program for consuming them.
I'm using the Marketing Beta Release for this so any partner will be able to download the VPC image and repeat this exercise.
First of all, you'll need to expose the Customer Page (Object ID=21) as a web service with a service name of Customer. This is as simple as running form 810 Web Services and inserting a record with Object Type=Page, Object ID =21, Service Name=Customer and ticking the Published field.
 If you enter http://localhost:7047/DynamicsNAV/ws/CRONUS_International_Ltd/Page/Customer in your web browser, you should see the WSDL for the page web service. It still amazes me how easy this is.
Now it's time to start up InfoPath. On the Getting Started page, click the Design a Form Template... option on the left hand pane.
 In the Design a Form Template dialog, click the Web Service option and click OK.
 Select the option to Receive and submit data and click the Next button. Paste the URL for the Customer Web Service into the field that is asking for the location of the data connection web service. If you used the right URL (I just copied it from my browser address bar after I had checked the WSDL for my web service) you should see the following screen when you click Next.
 I found this screen a little confusing because I've never used InfoPath before I didn't realise it is wanting me to tell it which method can be used for reading data from the web service. Select the ReadMultiple option and click Next. On the next screen, you get an opportunity to name the data connection. I left mine as the default Main query and clicked Next. The next screen askes for the URL to the web service that will be used when users submit their changes. It defaults to the previous URL so just click Next. On the following screen you are asked to select the operation that will be used for submitting the data. I selected UpdateMultiple and clicked Next.
 On this page we need to specify where the Customer comes from so I clicked the Modify button next to the Field or group text box and drilled down until I could select the Customer Node in the XML structure.
 You can leave the name for the data connection as Main submit and click the Finish button. If all went to plan, you should now have a new template to drag your fields on to.
  Drag the filter group on to the Query fields area of the design surface and select the option to add the groups as a repeating table. This way users will be able to add any filter fields to the read command. You can select the properties of these fields and set a default value - for example, Field defaults to No. and Criteria defaults to *. This will ensure you get some records back. You will also need the setSize parameter since this is mandatory for the ReadMultiple operation. Drag this on to the control surface and give it a default of 100. You should have a query section that looks something like this.
Now expand the dataFields node and drag the Customer node on to the fields area of the design surface and once again select Repeating Table as the option. This puts in every field which is way too much so just right click on the table after you have created it and selec the properties, then click the Change Binding button. You will see a tree that is expanded to show the customer node, that's fine, just click Next and you'll get on to a dialog where you can remove fields. For a quick way to remove all fields, click in the Columns in table list box and hold down Alt+R until there are no fields left - now you can click on the fields you want and add them. I used No, Name, Address and City. You should re-size the fields so they fit the available space and have a larger Name and Address field. Now it's time to run the form and see what happens. Click the Preview button. When prompted, select the option to connect rather than work offline. Hit the Run Query button and accept the dialog box and you should see something similar to the following.
 Nice! OK now you can try editing the name of one of the customers and hitting the submit button. If you see a dialog saying "The form was submitted successfully, you've just updated the NAV data!
Friday, 24 October 2008
NAV 2009 Edit in Excel
At our recent NAV User Group conference, I had the pleasure of seeing some new NAV 2009 functionality demoed by our local Microsoft ERP Expert.
In the demo, Sue set a filter on a list of records (I think it was a vendor list) and then from the Actions command menu selected a new option called "Edit in Excel".
This looked similar to the Send to Excel feature with one difference. There was a new button on a Dynamics NAV tab of the Ribbon that allowed the data to be updated.
In the demo, Sue deliberately set the Responsibility Centre in the spreadsheet to an invalid value and the update returned an error message that the Responsibility Centre was not valid. She then corrected the data in the spreadsheet, hit the update button and the data was updated in NAV.
This was a fantastic demonstration of the new NAV 2009 web services in action. I'm pretty sure this option is not available in the Marketing Beta Release that is available to partners and the image Sue had was based on Windows Server 2008.
It looks like there's definitely more cool stuff coming in the NAV 2009 release and this ability to edit data in Excel is going to prove extremely useful to many users.
In the demo, Sue set a filter on a list of records (I think it was a vendor list) and then from the Actions command menu selected a new option called "Edit in Excel".
This looked similar to the Send to Excel feature with one difference. There was a new button on a Dynamics NAV tab of the Ribbon that allowed the data to be updated.
In the demo, Sue deliberately set the Responsibility Centre in the spreadsheet to an invalid value and the update returned an error message that the Responsibility Centre was not valid. She then corrected the data in the spreadsheet, hit the update button and the data was updated in NAV.
This was a fantastic demonstration of the new NAV 2009 web services in action. I'm pretty sure this option is not available in the Marketing Beta Release that is available to partners and the image Sue had was based on Windows Server 2008.
It looks like there's definitely more cool stuff coming in the NAV 2009 release and this ability to edit data in Excel is going to prove extremely useful to many users.
Tuesday, 30 September 2008
Calling Web Services in the Marketing Beta of NAV 2009
My first experience of using web services in the Marketing Release (CTP4) for Dynamics NAV 2009 resulted in a couple of errors. The first one I experienced was a bit of confusion over the way Visual Studio 2008 handles web services.
If I had read through Lars Lohndorf-Larsen’s blog post on how to consume a web service properly this wouldn’t have been a problem, but basically if you want to add a web service in VS 2008, it’s a little different.
When I went to add my service, there was no add web reference option.
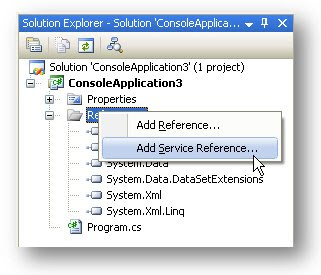
I thought, hey that’s cool they’ve changed the name and updated the user interface, so I just selected this option and put in my address. But when I came to use the web service I got the shock of my life when none of my methods were there. Now I had to go back and read Lars’ post and this time I was determined to follow it step by step to see what I was doing wrong.
Sure enough Lars does say:
2) This step depends a bit on whether you use VS2005 or 2008. In VS2005, just rightclick on "References" in the Solution Explorer, and select "Add Web Reference". In VS2008, to get to the same place, rightclick on "References", then select "Add Service Reference", then click the Advanced button, and then click the "Add Web Reference" button.
So when you see this screen:
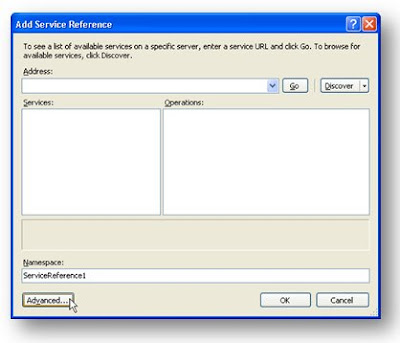
Click the Advanced button and then click the Add Web Reference button.
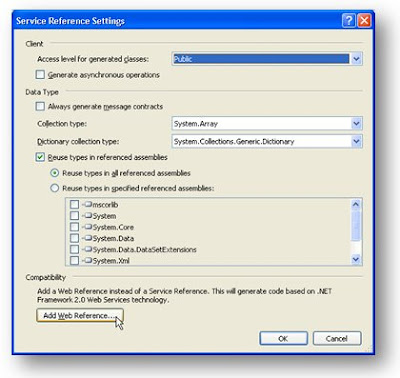
Now we’re back in familiar territory and everything works as it did previously.
Except – my console app didn’t work! I kept getting this error: "Path property must be set before calling the Send method."
I think this problem only happens when you are adding multiple web references to a single project (not uncommon) and I’m really not sure why it happens – maybe someone who knows a bit more about .NET and visual studio 2008 could add a comment as to why this happens.
Even though the URL property is set on the web reference, for some reason the service doesn’t know the URL, so I needed to explicitly set it within the code.
Here’s an example.
SSRef.SystemService SysServ = new SSRef.SystemService();
SysServ.Url = "http://localhost:7047/DynamicsNAV/ws/SystemService";
SysServ.UseDefaultCredentials = true;
I guess this is my first blog post on NAV 2009 although, like many people, I’ve been working with it a lot since the CTP3 release. I have to say that this is an amazing product and I really can’t wait to start using this for real. Nice one Microsoft!
If I had read through Lars Lohndorf-Larsen’s blog post on how to consume a web service properly this wouldn’t have been a problem, but basically if you want to add a web service in VS 2008, it’s a little different.
When I went to add my service, there was no add web reference option.

I thought, hey that’s cool they’ve changed the name and updated the user interface, so I just selected this option and put in my address. But when I came to use the web service I got the shock of my life when none of my methods were there. Now I had to go back and read Lars’ post and this time I was determined to follow it step by step to see what I was doing wrong.
Sure enough Lars does say:
2) This step depends a bit on whether you use VS2005 or 2008. In VS2005, just rightclick on "References" in the Solution Explorer, and select "Add Web Reference". In VS2008, to get to the same place, rightclick on "References", then select "Add Service Reference", then click the Advanced button, and then click the "Add Web Reference" button.
So when you see this screen:

Click the Advanced button and then click the Add Web Reference button.

Now we’re back in familiar territory and everything works as it did previously.
Except – my console app didn’t work! I kept getting this error: "Path property must be set before calling the Send method."
I think this problem only happens when you are adding multiple web references to a single project (not uncommon) and I’m really not sure why it happens – maybe someone who knows a bit more about .NET and visual studio 2008 could add a comment as to why this happens.
Even though the URL property is set on the web reference, for some reason the service doesn’t know the URL, so I needed to explicitly set it within the code.
Here’s an example.
SSRef.SystemService SysServ = new SSRef.SystemService();
SysServ.Url = "http://localhost:7047/DynamicsNAV/ws/SystemService";
SysServ.UseDefaultCredentials = true;
I guess this is my first blog post on NAV 2009 although, like many people, I’ve been working with it a lot since the CTP3 release. I have to say that this is an amazing product and I really can’t wait to start using this for real. Nice one Microsoft!
Subscribe to:
Posts (Atom)

