In this post I am going to show you how you can use a graphical editing tool (that you probably already have) to create your own XSLT. You will need the XSLT we created in Part 2 so if you haven’t read that yet, I suggest you jump back and start there.
I have read a few posts on this topic asking whether there are any tools that can help you create XSLT transformations without having to hack xml in a text editor. You may be surprised to learn that Microsoft Word (2003 or 2007) can be used to format your raw xml file to create a seed file and a transform inference tool (provided by Microsoft) will then create the XSLT for you.
There is one little snag (isn’t there always?) The transform inference tool (what a great acronym that makes ;-) needs the raw xml file to have a namespace attribute. Unfortunately NAV does not include a namespace attribute in the xml document it creates so the first thing we need to do is change the code that generates the xml so that this attribute is added.
Open up Codeunit 403 - Application Launch Management and press Ctrl-End to get to the bottom of the code. The third-to-last function is called AddElement and is used to add all of the elements to our raw xml file. In this example, I am going to use a namespace of ‘NAV’ – but you could use anything, provided it is not used by other XML documents (this is why you often see a URL in the name space.) Add a new line in the code so it looks like this:
ChildNode := ParentNode.ownerDocument.createNode('element', NodeName, '');
ChildNode.text := NodeText;AddAttribute(ChildNode,'xmlns','NAV'); // My new line to set the namespace attribute.
ParentNode.appendChild(ChildNode);
CreatedChildNode := ChildNode;
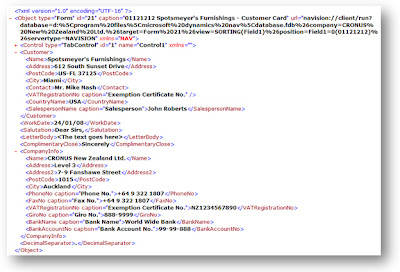
Now we get to the point where you’ll need the XSLT we created in Part 2. Hopefully you have this hooked up to export to Internet Explorer. I am going to create a new letter template to be generated from the customer card so, first of all, you need to export a customer record to give us our raw file. Launch the customer card (Sales & Marketing > Sales > Customers) and click the Send Options button on the toolbar. Select the Internet Explorer application and the Style Sheet we created in Part 2. Hit the Send button and you should see Internet Explorer launch with an XML document.

In the image, I have collapsed the Control element to show the Customer, WorkDate, Salutation, LetterBody, ComplimentaryClose, CompanyInfo, and DecimalSeparator elements. You’ll notice that the Control element has a different namespace to the other elements (it shows xmlns=“”.) This is because the Control elements are already in the DataXML document when our codeunit 403 runs so it does not get the xmlns attribute added by our line of code. Since we are only going to use the extra elements and not the control elements, let’s not worry about this.
I would expect there will be some changes to the way NAV creates this XML document in the future. As you will see, Word does not work very well with empty elements where the data is actually stored within the attributes. I would not be surprised if the Control elements are changed so that value attribute is actually the text of the control node rather than being an attribute. I would also expect that a namespace attribute will be added – but who knows? Maybe Microsoft has some other grand plan for making it easy for users to create their own XSLT transformations.
From within Internet Explorer, save the XML file as “customer raw.xml” and open the file in Word. I am using Word 2007 but I am pretty sure the same features are available in Word 2003.The first thing you will notice is a whole bunch of empty tags. The first time I saw this, I figured I was doing something wrong – until I realised that the values of the form controls are attributes and Word does not display the attributes in the Word document.

We can get rid of these Control elements. Double click the first Control tag and press Delete. You should now see the Object element with the Customer and other elements beneath it.

Now you can format this document how you want. Create tables, add graphics, etc. When you move data, be sure to copy all of the tags. For example, if you want to put the customer’s name, you would need to ensure it is still within the parent tags of Customer and Object.

Above you can see my re-formatted document. I find it easier to work with the format with the XML tags displayed. Then I remove the tags by removing the tick from the Show XML tags in the document. It looks like this:

Save your document in an xml format when you’re happy with the layout. In Word 2007, this means saving as a Word 2003 xml Document. Make sure you remove the tick from save data only. If you don’t remove this tick, your transformation won’t work. I find it easier to save my document with a name “customer seed.xml” as this lets me easily identify which file contains the raw data and which is the seed for my transformation.

No comments:
Post a Comment